Master the Art of Butternut Squash: Cut in 5 Minutes, Safely and Efficiently
Butternut squash, with its rich, sweet flavor and vibrant orange flesh, is a beloved staple in countless autumnal and winter dishes. From creamy soups to hearty roasts and comforting purees, its versatility is unmatched. However, the prospect of tackling its thick skin and challenging shape often deters home cooks, leading many to opt for pre-cut, more expensive alternatives. The good news? Learning
how to cut butternut squash doesn't have to be a daunting task. In fact, with the right tools and a smart, streamlined approach, you can transform a whole squash into perfectly prepped pieces in as little as five minutes. This comprehensive guide will equip you with the knowledge and confidence to conquer this culinary challenge, making butternut squash a regular, stress-free addition to your kitchen repertoire.
Gathering Your Arsenal: Essential Tools for Squash Success
Before you dive in, ensure you have the proper equipment. Using the right tools is paramount not only for efficiency but, more importantly, for safety. A dull knife is a dangerous knife, requiring more force and increasing the risk of slips.
- A Very Sharp Chef's Knife or Cleaver: This is your primary weapon. A heavy, well-balanced knife will make clean cuts through the squash's tough exterior with minimal effort. If you haven't sharpened your knives recently, now's the time!
- Sturdy Cutting Board: Opt for a large, stable cutting board that won't slip. Placing a damp kitchen towel underneath can add extra grip and prevent unwanted movement.
- Y-Shaped Vegetable Peeler: While other peelers can work, a Y-peeler (sometimes called a swivel peeler) is exceptionally efficient for removing the skin of a butternut squash, conforming well to its curves and requiring less wrist strain.
- Sturdy Spoon or Ice Cream Scoop: A metal soup spoon with a slightly thinner edge or an ice cream scoop works wonders for scraping out seeds and fibrous strands from the squash's cavity.
- Damp Kitchen Towel (Optional but Recommended): This can be invaluable for gripping the squash firmly, especially if you find its surface slippery or if you’re prone to the sticky sap it sometimes releases.
With your tools at the ready, you’re just moments away from perfectly prepped butternut squash.
The 5-Minute Method: A Step-by-Step Guide on How to Cut Butternut Squash
This method breaks down the intimidating task into four logical, manageable steps, ensuring safety and speed.
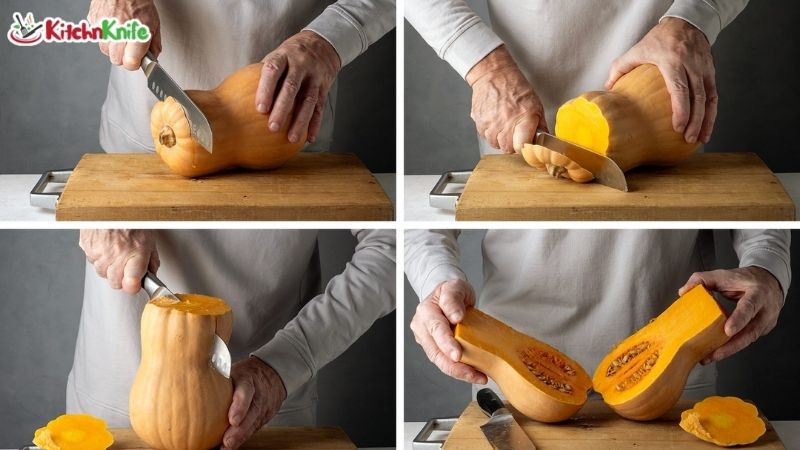
Step 1: Stabilize and Section Your Squash
The key to safely cutting any large, irregular vegetable like butternut squash is to create flat, stable surfaces.
- Trim the Ends: Lay the squash on its side on your sturdy cutting board. Using your sharp chef's knife, carefully slice off about a quarter to half-inch from both the stem and blossom ends. This creates two flat, stable bases. Discard these trimmed pieces.
- Find the Waist and Halve: Butternut squash has a distinctive "neck" and a bulbous "bottom." There's a natural indentation or change in shape where these two sections meet – this is your "waistline." Stand the squash upright on one of its freshly cut flat ends. Carefully, yet firmly, slice through the squash horizontally at this natural waist. You'll now have two distinct pieces: a solid, seedless neck and a rounder, seed-filled bottom section. This separation is crucial for making the subsequent steps much easier and safer. For a more detailed look at handling tricky vegetables, read our guide on Conquer Butternut Squash: Your 4-Step Safe Cutting Guide.
Step 2: Peel with Precision
Peeling a large, whole squash can be unwieldy. By peeling the smaller, more manageable sections, you significantly reduce the effort and risk.
- Secure and Peel: Take one of your squash sections (the neck is often easier to start with) and place its freshly cut, flat end firmly on the cutting board. If you're using a damp towel for grip, now's the time to hold the squash with it in your non-dominant hand. With your Y-peeler, apply firm, consistent pressure, peeling downwards from top to bottom, away from your body. Rotate the squash as you peel, ensuring all the tough outer skin is removed. The skin is technically edible when cooked, especially roasted, but it tends to be tough and unpalatable for most recipes, so removal is usually preferred.
- Handle the Sap: You might notice a sticky, sappy residue on your hands. This is natural and harmless but can be a bit chalky or waxy. If it bothers you, simply use a kitchen towel to hold the squash or wear kitchen gloves.
Step 3: Seed and Scoop
This step focuses on preparing the seeded bulbous section.
- Slice the Bulb in Half: Take the round, bottom half of your squash. Place it cut-side down on your board for stability. Carefully slice it in half lengthwise, from top to bottom. This will expose the central cavity filled with seeds and stringy membranes.
- Scoop Out Seeds: Using your sturdy spoon or ice cream scoop, firmly scrape out all the seeds and fibrous strands from the cavity of both halves. Discard the seeds, or, if you're feeling adventurous and want to add another layer of flavor to a stock or soup, you can rinse and simmer them with vegetable broth before discarding.
Step 4: Dice, Slice, Chop, or Spiralize
Now that your squash is peeled and deseeded, it's ready for its final form. Work with one half at a time to maintain control.
- Create Planks: Lay one of your squash halves cut-side down. Using your sharp chef's knife, slice it lengthwise into planks of your desired thickness. For cubes, aim for planks about 1/2 to 1 inch thick.
- Cut into Strips: Stack a few of these planks (if stable) or work with one at a time. Slice the planks into strips (or "fries").
- Dice into Cubes: Finally, gather your strips and cut them crosswise into uniform cubes. The key here is consistency in size for even cooking. For other preparations, you might opt for longer slices, julienned strips, or even use a spiralizer to create "squash noodles." Mastering these various cuts and general knife skills can be significantly improved by checking out Butternut Squash Cutting Made Easy: Master Tricky Veggies Safely.
Repeat this process for the remaining squash sections until all of your butternut squash is cut into the desired pieces.
Expert Tips for Butternut Squash Success
To ensure your butternut squash cutting experience is always smooth and swift:
- Always Sharpen Your Knife: We can't stress this enough. A sharp knife glides through, minimizing effort and risk.
- Stability is King: A wobbly squash or cutting board is a recipe for an accident. Ensure everything is stable before making a cut.
- Choose Wisely: When selecting a squash, look for one that is firm, heavy for its size, and free of soft spots or blemishes. A vibrant, even beige color is also a good indicator of ripeness.
- Store Smarter: Whole butternut squash can be stored in a cool, dark place for several weeks or even months. Once cut, store peeled and diced butternut squash in an airtight container in the refrigerator for up to 3-5 days. It also freezes beautifully for longer storage!
- Don't Force It: If you find a particular squash exceptionally tough, you can microwave it whole for 1-2 minutes (pierced a few times with a fork) to slightly soften the skin. While this adds a little to the "5-minute" goal, it's a safer alternative to struggling with excessive force.
Beyond the Cut: What to Do Next
Once you’ve mastered
how to cut butternut squash, a world of culinary possibilities opens up. The evenly cut pieces are perfect for roasting with herbs and olive oil, simmering into a creamy, comforting soup, adding to hearty stews, or even pureeing for baby food or baking. Experiment with different seasonings and cooking methods to discover your favorite ways to enjoy this nutritious and delicious vegetable. Its natural sweetness pairs wonderfully with spices like sage, thyme, cinnamon, and nutmeg, making it versatile for both savory and sweet preparations.
Conclusion
Cutting butternut squash might seem intimidating at first, but with this simple, efficient, and safe 5-minute method, you can transform this culinary challenge into a quick and satisfying task. By following these clear steps – stabilize, peel, seed, and dice – you'll confidently prepare butternut squash for any recipe. So, next time you’re at the grocery store, don’t shy away from that beautiful, bulky butternut squash. Grab one, head home, and apply your newfound skills. You'll be amazed at how quickly and safely you can enjoy this nutritious and delicious ingredient, ready to elevate your cooking with minimal fuss.