Butternut Squash Cutting Made Easy: Master Tricky Veggies Safely
The very sight of a large, unyielding butternut squash can send shivers down the spine of even an experienced home cook. Its tough, impermeable skin and awkward, pear-like shape make it one of the most intimidating vegetables to prepare. Yet, beneath that challenging exterior lies a sweet, nutty, and incredibly versatile flesh, brimming with vitamins, fiber, and delicious potential. From comforting soups to vibrant roasted side dishes, butternut squash is a fall and winter culinary star that’s worth the effort. So, if you've ever wondered how to cut butternut squash without risking a finger or breaking a sweat, you're in the right place. This comprehensive guide will equip you with the knowledge and confidence to transform that formidable squash into ready-to-cook pieces, safely and efficiently.
Conquering the butternut squash isn't just about wielding a sharp knife; it's about approaching a seemingly daunting task with a strategic mindset. By breaking down the process into manageable, logical steps, you'll discover that mastering this "tricky veggie" is far more approachable than you might imagine. Forget the wrestling matches and embrace a method that prioritizes safety, preserves flavor, and prepares you for countless delicious meals.
Pre-Preparation: The Foundation of Safe Squash Cutting
Before you even touch that knife, a few crucial preliminary steps will make all the difference in your butternut squash preparation journey. Safety and efficiency begin here.
- Gather Your Tools: A sharp, heavy chef's knife or cleaver is non-negotiable. A sharp knife requires less force, reducing the chance of slippage and injury – it's counter-intuitive, but true! A dull knife is a dangerous knife. You'll also need a sturdy cutting board (preferably non-slip, or place a damp kitchen towel underneath it for stability), a Y-shaped vegetable peeler, and a robust spoon (like a metal soup spoon or an ice cream scoop).
- Wash and Dry: Give your squash a quick rinse under cold water to remove any dirt or debris, and then thoroughly dry it with a clean towel. A wet squash can be incredibly slippery, significantly increasing the risk of accidents during cutting.
- Acknowledge the Challenge (and its Solution): Butternut squash is tough. Its skin is thick, and its shape is uneven. The key to successful cutting is to create flat, stable surfaces at every stage, preventing the squash from rolling or wobbling on your cutting board. This stability is paramount for safety.
Step 1: The Strategic Divide – Creating Stability from Instability
The first and most critical step in learning how to cut butternut squash is to tame its irregular, "roly-poly" shape. Instead of trying to peel or chop the entire, unwieldy squash, we’ll strategically cut it into stable, easier-to-handle pieces. This is where its natural "waistline" comes in handy, serving as your guide.
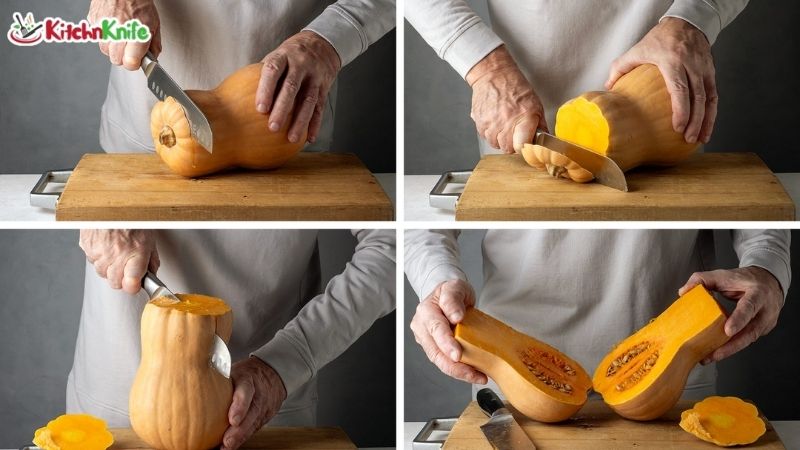
- Trim the Ends for a Flat Base: Lay the butternut squash on its side on your stable cutting board. Using your sharp, heavy knife, carefully cut off about 1/2 to 1 inch from both the stem end and the blossom end. These cuts create crucial flat, stable bases that will prevent the squash from rolling, giving you a safe starting point.
- Locate the Natural "Waist": Observe the butternut squash's distinct shape. It typically has a solid, cylindrical neck (the top, thinner part, mostly flesh) and a bulbous, rounder bottom (where the seeds are located). The point where these two distinct sections meet is its natural "waist" or transition point. This is your target for the first major cut.
- Cut in Half for Manageability: Stand the squash upright on one of its newly flattened ends. With your dominant hand firmly on the knife handle and your non-dominant hand holding the squash steady from the top (fingers tucked away from the blade!), carefully slice horizontally through the squash at its waist. Apply firm, steady pressure, using a controlled rocking motion if your knife isn't long enough for a single pass. You'll now have two distinct pieces: the solid neck and the hollowed-out bulb. This fundamental division makes all subsequent steps significantly easier and safer. For a visual guide and more depth on this initial cut, check out our article Conquer Butternut Squash: Your 4-Step Safe Cutting Guide.
Step 2: Peeling – Removing the Tough Exterior Safely
Now that your squash is in more manageable pieces, it's time to tackle that notorious, tough skin. While butternut squash skin is technically edible when fully roasted until tender, it often has an unappealing texture and can remain tough in many recipes like soups or purees. For most applications, removing it is best for a smoother, more enjoyable dish.
- Work with Smaller Sections: Take one of your squash halves. Hold it firmly in your non-dominant hand. For enhanced grip and to manage the sticky sap (see below), you might find it helpful to hold the squash with a clean kitchen towel.
- Utilize a Y-Peeler for Efficiency: Use your Y-peeler in your dominant hand. Position the peeler at the top of the squash section and pull downwards, removing strips of skin. The Y-peeler's design often provides greater leverage and control than a swivel peeler, making it more effective for large, firm vegetables like squash. Continue rotating the squash and peeling until all the tough outer skin is removed. Ensure you remove any remaining green or pale yellow bits, as these indicate areas of unpeeled skin that will be tough.
- Dealing with the Sticky Sap: You might notice a sticky, sometimes chalky or waxy residue accumulating on your hands. This is a natural sap (a type of polysaccharide) released by the squash. While harmless, it can be annoying. To minimize contact, consider wearing thin kitchen gloves or using a kitchen towel to hold the squash. If it gets on your hands, a little cooking oil (like olive or vegetable oil) rubbed into your skin before washing with soap and water, or even rubbing alcohol, can help remove it more easily than just soap alone.
Step 3: Seeding and Stringy Membranes – Preparing the Core
With the skin gone, we move on to the internal structure of the squash. Fortunately, only the bulbous bottom half contains seeds and stringy membranes that need to be removed. The cylindrical neck piece is solid flesh, completely seed-free and ready for chopping.
- Address the Bulb Half: Take the rounder, bottom half of the squash. Its exposed, hollowed-out cavity will clearly reveal the mass of seeds and fibrous, web-like strands.
- Scoop it Out Thoroughly: Grab your sturdy spoon (a metal soup spoon, an ice cream scoop, or even a grapefruit spoon with its serrated edge works wonders here). Systematically scoop out all the seeds and the stringy, web-like membranes. Be thorough, as these membranes can have an unpleasant, fibrous texture if left in your cooked dish. Discard them, or if you're feeling adventurous and enjoy zero-waste cooking, clean and roast the seeds for a crunchy, nutritious snack similar to pumpkin seeds!
Step 4: Slicing, Dicing, and Chopping – Ready for Cooking
Now for the fun part – transforming your peeled and seeded squash pieces into bite-sized perfection. This is where your newly acquired skills for how to cut butternut squash truly shine, setting you up for success in any recipe.
- Process the Neck Piece: Lay the solid, cylindrical neck piece flat on your cutting board. This piece is easy to work with due to its uniform thickness. You can slice it into even rounds, then stack a few rounds and cut them into sticks, and finally dice them into cubes of your desired size. Aim for uniform pieces to ensure even cooking, whether you're roasting, sautéing, or adding to a stew.
- Process the Bulb Piece: Take the hollowed-out bulb half. Place it cut-side down on the board to create a stable base (it might still have a slight curve, so ensure it's secure). Slice it into crescent-shaped pieces, then cut those into sticks, and finally dice them into cubes. Again, consistency in size is key for even cooking.
- Consider Your Recipe's Needs: The way you chop your squash depends entirely on your recipe:
- Roasting: 1/2 to 1-inch cubes are generally ideal for roasting, ensuring they cook through evenly and caramelize beautifully on the edges.
- Soups/Purees: Larger chunks (1-2 inches) are perfectly fine as they will be softened and blended anyway.
- Stir-fries/Salads: Thinner slices or matchsticks (julienne) might be preferred for quicker cooking and delicate presentation.
- Spiralizing: The solid neck of the butternut squash is perfect for creating "noodles" for a healthier, gluten-free pasta alternative.
- Maintain Knife Safety: Always keep your fingertips tucked under, forming a claw grip to guide the knife. Your non-dominant hand should be a steady guide, not a target. Pay attention to the blade at all times.
Beyond the Basics: Advanced Tips and Storage
You've mastered the main steps, but here are a few extra nuggets of wisdom to elevate your butternut squash game and ensure maximum convenience:
- Too Hard to Cut? A Microwave Trick: If your squash feels exceptionally tough, you can soften it slightly before cutting. Pierce the skin several times with a fork (to allow steam to escape), then microwave it for 2-4 minutes (depending on size). This will make it significantly easier to slice, but be careful as the squash will be hot!
- Storage of Pre-Cut Squash: Once cut, peeled, and seeded, butternut squash can be stored in an airtight container in the refrigerator for 3-5 days. For longer storage, you can blanch the cubes for a couple of minutes, cool them, and then freeze them in a single layer before transferring to freezer bags. They will keep for up to 6 months, perfect for quick additions to winter stews or soups.
- Embrace the Versatility: Don't limit yourself to just roasting. Butternut squash is fantastic in curries, risottos, lasagna, macaroni and cheese, casseroles, and even baked goods like muffins or pies. Its sweet and savory versatility is unmatched.
You’ve taken the first big step from intimidation to inspiration. With a sharp knife, a stable surface, and these clear, step-by-step instructions, preparing butternut squash is no longer a kitchen nightmare but a rewarding culinary ritual. Now that you know how to cut butternut squash like a pro, you’re ready to unlock a world of delicious possibilities. And if you’re looking to get this done in record time, our guide on Cut Butternut Squash in 5 Minutes: The Simple, Efficient Method offers even more speed-focused insights. So go forth, conquer that squash, and enjoy the sweet, wholesome rewards!
