Conquer Butternut Squash: Your 4-Step Safe Cutting Guide
The sight of a whole butternut squash can be both inspiring for its culinary potential and, let's be honest, a little daunting. Its firm, thick skin and awkward, pear-like shape make it one of the more challenging vegetables to prepare, leading many home cooks to wonder precisely how to cut butternut squash safely and efficiently. But fear not! This comprehensive guide is designed to transform that kitchen intimidation into confidence, offering a fail-proof, four-step method that will have you slicing and dicing like a seasoned chef in no time. Butternut squash is a versatile and nutritious autumn staple, perfect for everything from hearty soups and comforting purees to roasted sides and vibrant salads. Learning the proper technique not only ensures your safety but also unlocks a world of delicious possibilities. Forget the struggle and potential for slips; with the right tools and a clear plan, you'll be able to prepare this popular squash with ease, turning a tricky task into an approachable culinary adventure. For more quick tips, consider our guide on Cut Butternut Squash in 5 Minutes: The Simple, Efficient Method.Why Butternut Squash Can Be Intimidating (and How to Overcome It)
Many home cooks find themselves hesitating when faced with a whole butternut squash, and for good reason. Its tough, unyielding exterior requires significant force to cut through, and its irregular shape can make it unstable on a cutting board. This combination often leads to concerns about knife slippage and potential injury. However, the secret to overcoming this intimidation isn't brute force; it's strategy. By breaking down the process into smaller, manageable steps, and utilizing the right tools, you can minimize risk and maximize efficiency. Think of it as a culinary puzzle – once you understand its natural "breaks," the rest falls into place.Essential Tools for Safe Butternut Squash Preparation
Before you even think about making the first cut, gathering the correct tools is paramount for both safety and effectiveness. Skimping on quality here can turn a simple task into a frustrating, even dangerous, ordeal.Here’s what you’ll need:
- A Large, Very Sharp Chef's Knife or Cleaver: This is your primary weapon. A sharp knife is always safer than a dull one because it requires less pressure to cut, reducing the chance of slippage. A heavy, sturdy blade provides the necessary leverage to break through tough skin. If your knife isn't sharp, now's the time to hone it!
- A Sturdy Cutting Board: A non-slip cutting board is crucial for stability. Place a damp paper towel or a non-slip mat underneath your board to prevent it from shifting during cuts.
- A Y-Shaped Vegetable Peeler: While other peelers can work, the Y-peeler’s design allows for better grip and more efficient peeling strokes, making quick work of the butternut’s skin.
- A Strong Spoon (e.g., Soup Spoon or Ice Cream Scoop): For scooping out seeds and fibrous strands. A spoon with a slightly thinner, but not sharp, edge works best.
- Kitchen Towel or Gloves (Optional, but Recommended): Butternut squash can release a sticky sap that leaves a chalky, waxy film on your hands. A kitchen towel can provide a better grip, and gloves can protect your skin.
Your 4-Step Guide: How to Cut Butternut Squash Like a Pro
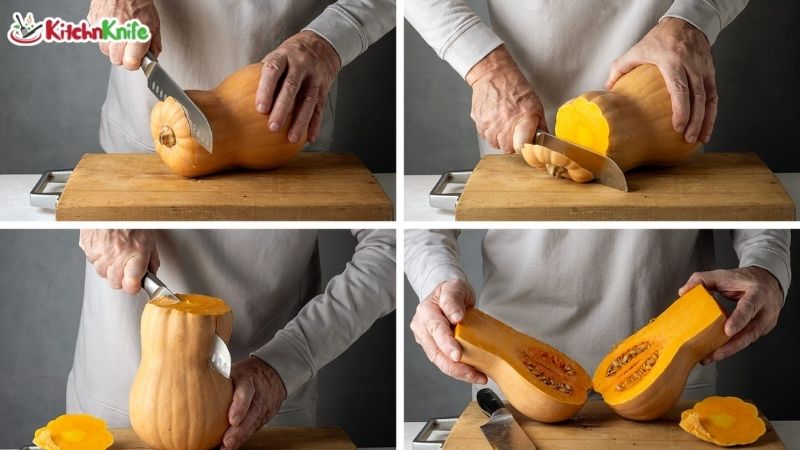
Now, let's dive into the core technique. By following these four steps, you'll safely transform your whole squash into ready-to-use pieces.Step 1: Prepare and Divide the Squash
The first step is about making the squash more manageable. Butternut squash, with its distinct pear shape, has a natural "waist" where the narrow neck meets the round, bulbous bottom. This is your key point for division.
- Stabilize the Squash: Lay the squash on its side on your sturdy cutting board. If it wobbles, you can gently trim a small, flat section from one side to create a stable base, just enough to prevent rolling.
- Trim the Ends: Using your sharp chef's knife, carefully slice off the top stem end and the bottom blossom end. Aim to remove just enough to create flat, stable surfaces. This makes the squash easier to handle and stand upright.
- Divide at the "Waist": Stand the squash upright on one of its freshly cut flat ends. Identify the point where the long, cylindrical neck transitions into the wider, rounder base. This is its natural division point. Carefully but firmly, cut straight through the squash at this "waist." This splits the squash into two more manageable pieces: a solid, seedless neck and a bulbous, seed-filled bottom. Remember, using a sharp knife requires less effort and is safer, preventing slips caused by excessive force.
Step 2: Master the Peel
Peeling the squash *after* it's been cut into smaller pieces is far easier and safer than trying to peel the entire unwieldy squash at once. The smaller sections offer better grip and control.
- Handle One Piece at a Time: Take either the neck or the bottom half of the squash. Hold it firmly in your non-dominant hand. If the sticky sap (oxalate crystals) is an issue, consider wearing gloves or wrapping the squash in a kitchen towel for a better grip and to protect your hands.
- Use Your Y-Peeler: With your dominant hand, apply firm, consistent pressure with the Y-peeler to remove the tough outer skin. Work in downward strokes, following the curvature of the squash. Be thorough, as any remaining bits of skin can be unpleasant to eat.
- Consider the Skin: While most recipes call for peeled butternut squash, the skin is technically edible, especially when roasted until very tender. If you plan to roast large chunks of squash and prefer to leave the skin on for convenience or fiber, ensure it's thoroughly scrubbed clean. However, for soups, purees, or dishes where a smooth texture is desired, peeling is essential.
Step 3: Seed and Scoop with Ease
Now that you have peeled pieces, it’s time to remove the seeds and stringy bits.
- Focus on the Bulbous Half: The long, cylindrical neck piece of the squash is entirely solid and seedless, so you can set it aside for now. Your focus will be on the rounder, bottom half.
- Scoop Out Seeds: Using a sturdy spoon (a soup spoon or an ice cream scoop works wonderfully), scrape out the seeds and any stringy, fibrous membranes from the hollow cavity of the bulbous half. The goal is to leave a clean, smooth interior.
- Don't Discard Seeds Immediately (Optional): Butternut squash seeds are edible and delicious when roasted! You can clean them, toss them with a little oil and salt, and roast them for a crunchy snack or garnish. For extra flavor in soups, you can also simmer the seeds with vegetable or chicken stock before straining them out, adding a deeper squash essence to your broth.
Step 4: Cube, Dice, or Spiralize for Culinary Creations
With your squash peeled and seeded, you’re ready for the final cutting step – transforming it into your desired shape and size.
- Slice the Neck: Take the solid neck piece and lay it flat on your cutting board. Slice it lengthwise into planks of your desired thickness.
- Dice the Bulbous Half: The bulbous half, now hollow, can be cut into smaller, more manageable pieces. Then, lay these flat and proceed to slice and dice.
- Achieve Uniformity: For even cooking, aim for pieces that are roughly the same size. For most applications like roasting or adding to stews, 1-inch cubes are ideal. You can also slice the squash into half-moons, julienne strips, or even use a spiralizer to create "squash noodles" for a low-carb alternative.
- Practice Makes Perfect: The principles you've learned here—breaking down the task, using sharp tools, and stabilizing your ingredients—can be applied to other tricky vegetables, truly making Butternut Squash Cutting Made Easy: Master Tricky Veggies Safely a transferable skill!
